Scheduler Set Up & Appointment Settings – Complete Guide
The ChiroSpring Scheduler allows you to control practice hours, provider availability, patient bookings, time blocks, reminders, online scheduling, and real-time workflow visibility.
Below we will walk you through
- Setting Scheduler Settings
- Setting your Appointment Categories (aka reasons of visits, visit types)
- Also included Provider Block category options
- Setting up your Scheduler (ie Availability)
- Understanding Scheduler Icons
- How to Schedule an Appointment
- Editing an Appointment - Managing Cancellations, No Shows, Missed Appointments and more
- Make Scheduler View Bigger
- Scheduler Widget
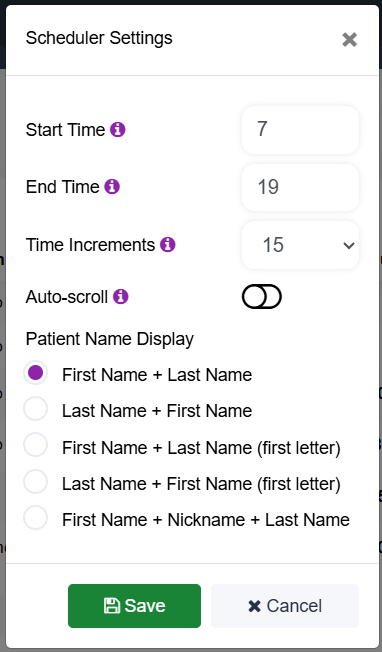
Set Scheduler Global Settings First
Access Scheduler Settings:
Left Menu → Settings → Clinic → Scheduler & Appts
Before creating appointment categories or time blocks, configure your global hours.
- Set:
- Global Start Time
- Global End Time
- This defines the earliest and latest times your practice operates.
- Times are entered in military format.
- After setting global hours, you can also set:
- The time increments you want your calendar to show by (5, 10, 15, 20, 25, 30 minutes)
- Toggle AutoScroll ON/OFF - This is a Global Setting (rather than user settings)
- How you want the Patient Name to Display on the Scheduler
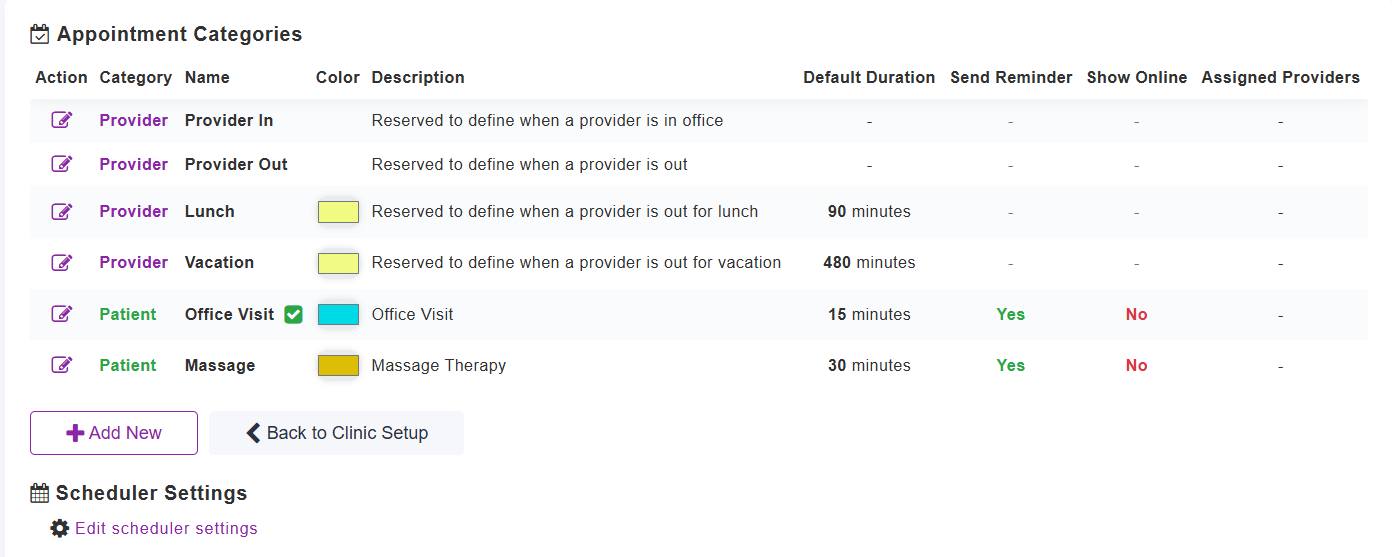
Appointment Categories
Appointment categories let you define what an appointment is for. As an example, you might want an appointment for "New Patient Visit" or "Adjustment". Or, if this is a provider appointment category you might want it "Time Off" or something like that.
There are two types of appointment categories:
- Provider Appointments (control the provider's availability)
- Patient Appointments (appointment types you can schedule patients for)
You can edit existing categories or click Add New to create additional ones.
Provider Appointments (Control Days & Hours)
Provider Appointments are used to set working hours and block off time for providers or rooms.
These control:
- Provider In
- Provider Out
- Lunch
- Vacation
- Any other OUT OF OFFICE or DO NOT SCHEDULE NEEDS
You assign these blocks directly to a provider or room on the scheduler (just like booking an appointment).
Examples
-
Closed Sundays:
Use the “Provider Out” time block starting at the first available time on Sunday and set it to repeat weekly.
-
Provider starts late on Mondays:
If practice hours are 8 AM–5 PM but a provider starts at 10 AM on Mondays, create a “Provider In” time block at 10 AM and set it to repeat weekly for that provider.
Be sure to select the correct provider when creating these blocks.
Reporting Tip
- Time blocks (vacations, lunch, etc.) can be reported on just like patient appointments.
- Keep this in mind when deciding whether to create specific or general block categories.
Patient Appointment Categories (For Scheduling Patient Visits)
These are used for actual patient visits, such as:
- New Patient Exam
- Adjustment
- Re-exam
- Therapy Visit
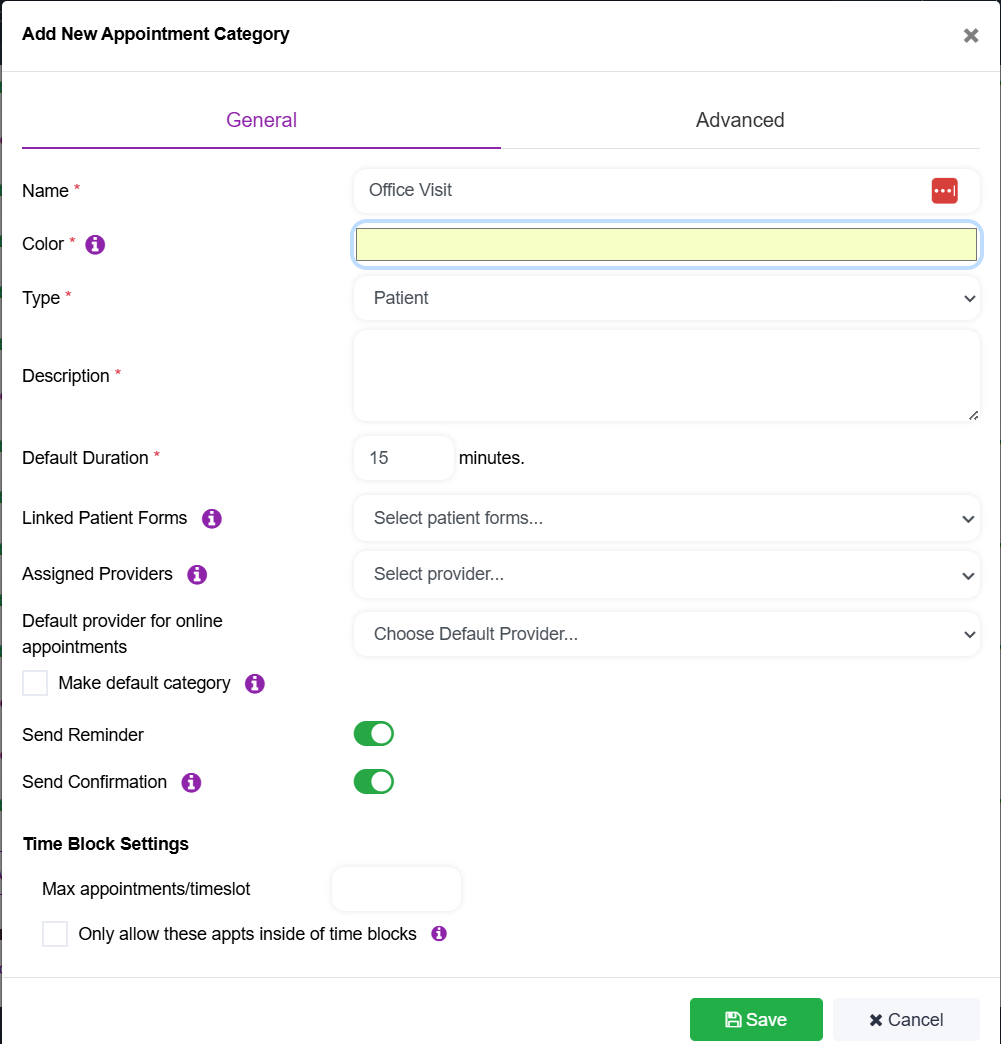
To create a Patient Appointment Category:
- Click Add New
Complete the following fields:
- Name of Visit Type
- Color - Full Color Wheel to choose from
- Type → Will default to patient
- Description
- Default Duration (in minutes)
-
Link Forms (optional)
Example: Link HIPAA and Contact forms to New Patient Exam.
Assigned Provider → Only providers assigned you will be able to schedule this visit on their scheduler
Default Provider for Online Appointment
Make a Default Category - You can only have one default appointment category and you MUST have one set as a default or your scheduler will not work
-
This is the appointment category that is defaulted when you initiate a new appointment
-
- Send Reminder → Toggle ON/OFF to send appointment reminders for this appointment category
- Send Confirmation → GrowthHub Pro Feature Only
- Time Block → If this category is used to control online scheduling availability
View Online Scheduling Article for more information on Time Blocks
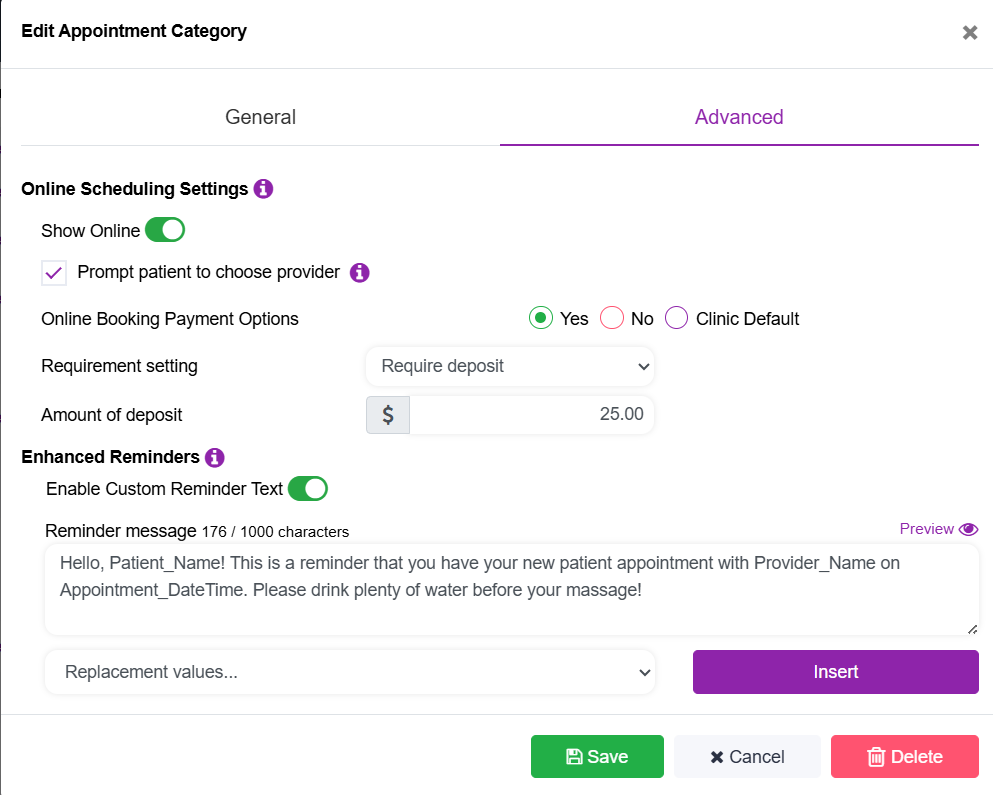
Advanced Tab Options
- Show Online → Allow patients to book this appointment category online
- Toggle ON/OFF: Prompt patient to choose a provider
- Online Booking Payment Options
- Used with ChiroSpring Pay Only
- Choose Yes, No, Clinic Default
- You can drop down to Require a Deposit and set amount per appointment category
- Or require a card on file
- Set your practice default in SETTINGS - COMMUNICATIONS - WORK FLOW RULES (ONLINE SCHEDULER TAB)
- Enhanced Reminders (GrowthHub Pro) → Customize reminder message for appointment category
Setting up your Scheduler
Now that you have your patient and provider appointment categories established, you can start setting up your Scheduler for each Provider/Room.
- The top left is a Quick Button to Today
- The arrows will go to the next (Day, Week, Month)
- The toggle will open up the calendar view options to the left including Date Picker, Location and Provider/Room Picker
- Providers/Rooms that are "Selected as a Header" will appear by default when you login and go to the Scheduler. You can update that default view using this toggle.
- The date(s) in current view
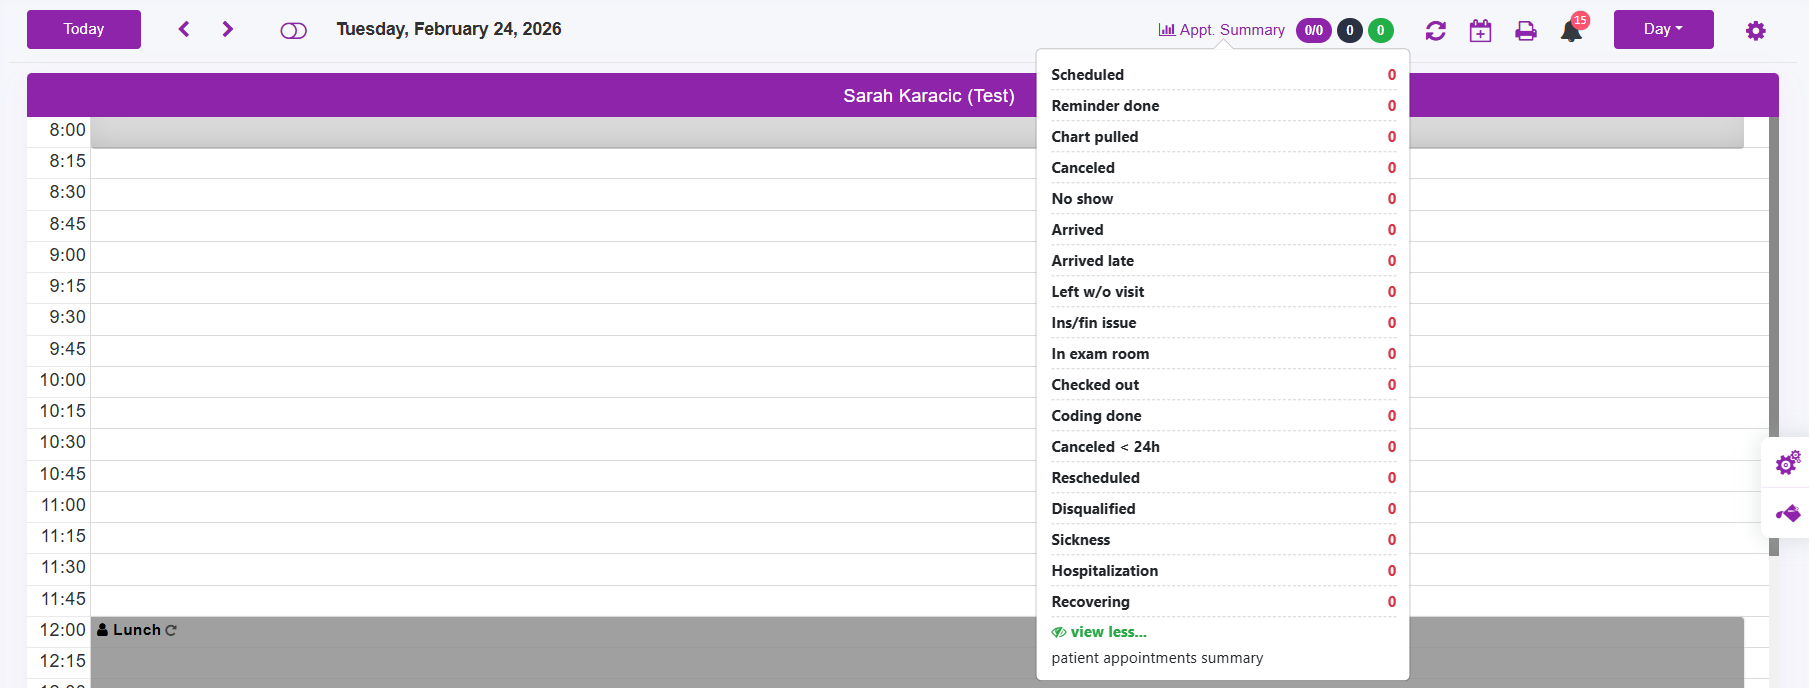
- Appt Summary is Clickable and then when opens, you can view more metrics by clicking at the bottom. The is a real time KPI summary of the current view of your scheduler
- Purple Circle- Number of appointments arrived and scheduled for date range viewing
- Black Circle - Number of claims created for date range viewing
- Green Circle - Number of notes created for date range viewing
- Refresh Scheduler
- Add New Appointment
- Patient Reminders
- Change view (Day, Week, Month)
- Week and Month can only be viewed for a single provider/room at a time
- Quick Access to Scheduler Settings
Icon Colors on the Scheduler
The scheduler uses visual indicators for workflow tracking:
- Black Tag – Checked Out
- Red Icon – Arrived, no note or claim
- Green Icon – Note completed only
- Black Icon – Claim created only
- Green Check – Note and claim completed
- Blue Icon – Not arrived
- $ Icon – Payment made
- Recurring Visit icon
- World Icon if booked through online scheduler
- Mobile Phone icon if booked through patient mobile app
These let you see operational status and more details instantly.
How to Schedule a New Appointment
Select any timeslot and the Create an Appointment dialog will open.
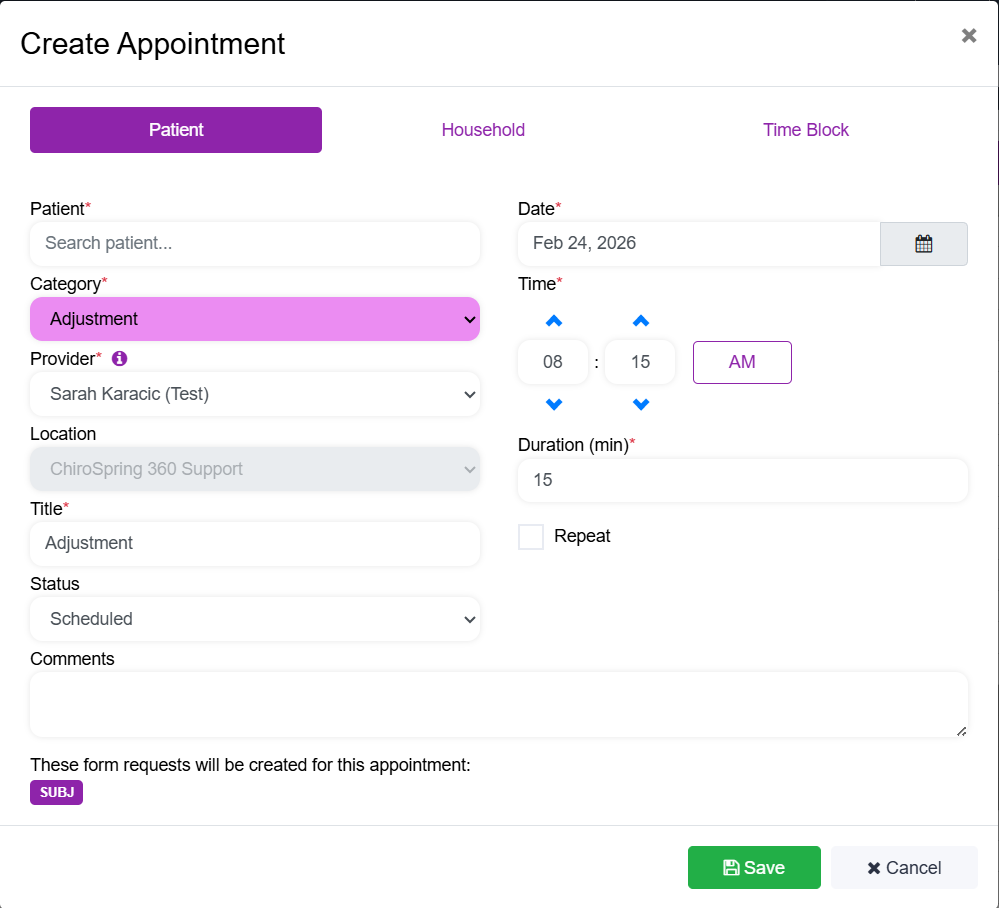
- It starts on Patient Appointment, you can tab to "Household" (Schedule a Household) or "Time Block" (block off time for a provider).

- Start typing patient first or last name and it will start to filter your database and will offer option to Create a New Patient.
- If you are scheduling an appointment for a brand new patient, you can add the patient to your database and schedule their appointment by click the "Add New Patient" option when searching

- Your default appointment category will appear, you can drop down to change
- The Provider/Room will default based on timeslot you clicked
- Quick Tip, if a provider/room is not auto selected here - This means the Provider/Room you clicked on to schedule is not set up to see the Appointment Category selected. You can navigate to Settings - Clinic - Appointment Categories to make that available for provider/room
- The location will default BASED on the Provider/Room selected
- Title will default to the Appointment Category name
- Status: Scheduled will be the default
- TIP: Using the Appointment Listings Report you can filter by "Status".
- Comments -> Anything in this box will appear as text on your scheduler for easy view
- TIP: If scheduling recurring visit, the comments will appear on every visit in that occurence
- To the right you can confirm you chose the right date/time and/or do any manual edits
- TIP: You may use these when rescheduling appointment, see below in Editing Appointments for more detail
- Edit duration if needed, it will default to duration set by the Appointment Category selected
- Check Repeat to schedule recurring visits
It will show any Patient Forms that are tied to that Appointment Category that will prompt in Patient File and then automatically in the Patient Mobile App and Self Check In Kiosk
- CLICK SAVE

Learn More About Scheduling Households —> CLICK HERE
Managing/Editing Appointment
How to Edit an existing appointment including Cancelling, Rescheduling and No Shows
- Find the appointment on the schedule
- Click on the appointment block to open the Edit Appointment Dialog
- From here you can Drop Down the Status to Update it to any of the global options (ie Cancelled, No Show, Rescheduled)
- You have Quick Buttons circled in the image below that will update the Status for you
- The RED TRASH CAN - will delete the appointment all together. It won't be on the scheduler or be trackable in Appointment Reports or Patient Account
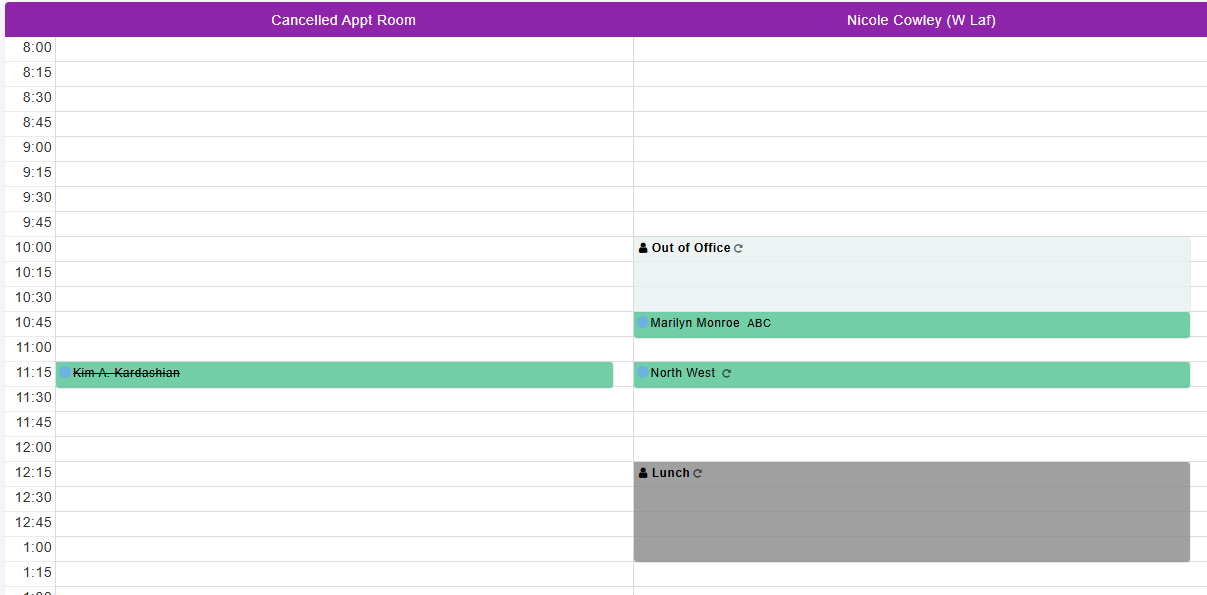
- The CALENDAR WITH X will update the Appointment Status to Cancelled - The appointment will remain on the scheduler with a line through it, and patient account/reports for tracking purposes
- BONUS TIP: Create a Room "called Cancelled" and you can change the Provider to the Cancelled Room, if you want these OFF of your schedule, but available for tracking/reporting later
-
- The EYEBALL WITH SLASH LINE will update the Appointment Status to No Show - And like cancelled, the appointment will remain on the scheduler with a line through it
- The PIN icon will mark the appointment as arrived and move them to Checked In on the Front Desk

For Reschedules:
You can simply change the date and time on this edit screen to Reschedule the appointment.

How to Make the Scheduler Bigger
If your screen feels cramped, here are eight ways to expand it:
-
Use browser zoom (Ctrl + or Ctrl -)
Remove unnecessary provider or room columns
- Main Menu → Clinic Setup → Uncheck “Active on Scheduler” or “Selected as Header”
- Close the left menu (click four horizontal lines above Today)
- Reduce left menu size
- Hide the calendar on the left
- Uncheck unused provider/room columns
- Close the Scheduler Widget
- Use a larger monitor or add a secondary screen
Sometimes the solution is software. Sometimes it’s hardware. Reality is rude like that.
Scheduler Widget
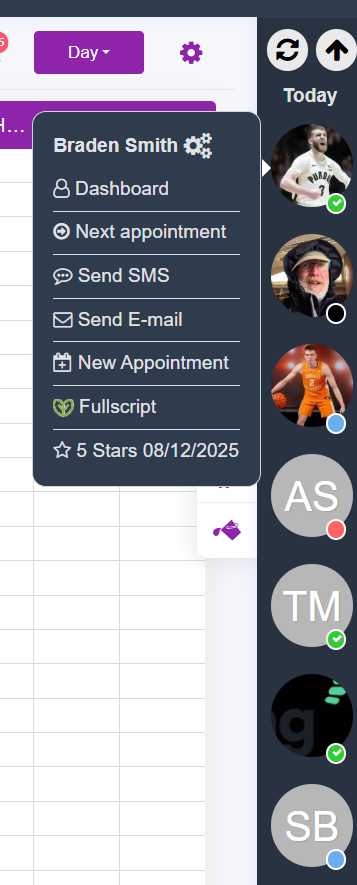
The Scheduler Widget (located on the far right of ChiroSpring as a vertical bar) shows real-time patient flow and appears in the far-right column as patient profile images.
To show or hide the scheduler widget click the People Icon in the top menu (see below).

By hovering over a patient’s photo or initials, users can:
- Gear Icon next to their name: Edit demographics
- Open the patient file (defaults to Treatment Dashboard)
- View next appointment
- Send SMS
- Send email
- Schedule another appointment
- Fullscript
- Send Review Link (GrowthHub / GrowthHub Pro)
It’s essentially your live command center.
Summary
The Scheduler is built around three core elements:
- Global Hours define practice operating times.
- Provider Appointments control availability.
- Patient Appointments manage bookings.
Time Blocks refine availability and prevent conflicts.
The Widget manages real-time patient flow.
Icons provide instant workflow tracking.
Set it up once, set it up correctly, and your schedule stops running you.