Online Scheduling - Using & Setup Procedures
Instant Online Appointment Scheduling is included with ChiroSpring’s 360 Pro+ plan—and if you’re not using it yet, it’s about to be a game-changer for your practice.
With online scheduling, patients can book appointments anytime, from anywhere. Appointments are automatically added to your ChiroSpring schedule, saving your team time and reducing phone traffic. You can also require a deposit or collect a credit card on file before confirming an appointment.
The online scheduler is fully customizable, allowing you to:
- Match your branding with your logo and colors – Click Here to customize your branding
- Choose which appointment types and providers appear online – Click Here
- Set rules for deposits or credit card collection (see below)
Watch Overview Video - Click Here
Watch Training Video - Click Here
Before you get started, we support both our classic Online Scheduler and our new Online Scheduler (image below).
Under ChiroSpring's settings/communication data section you will see both "Online Booking" and "Online Scheduler".
- Online Scheduler - This is the new interface (recommended)
- Online Booking - This is the old user interface (not recommended)

How Does it Work?
First, you will want to setup your schedule, appointment categories and settings, time blocks and which providers are assigned to those appointment categories before you share your custom URL online. This is to ensure patients are selecting times that are actually open, and, which match the appointments that provider wants to book patients for. As an example, you may not want a patient booking a massage with a chiropractor. Or, you might want new patients to book only on Tuesdays from 1 pm to 3 pm. You'll want to have all of that setup before posting the online scheduler to your website.
Before we get to how to make these configurations, here is a look at the online scheduler UI.

Patients can choose a category and then select a provider. The scheduler will update showing which time slots are available.
Next, the patient will choose an open time. This opens up a dialog letting them fill in their information to complete the online booking.

This is a super easy process for the patients.
ChiroSpring will automatically post the appointment to your scheduler, if that patient exists in your system. If the patient is not already in your system you will need to approve the appointment.
Appointment Requests
When appointments are made that do not match a patient (or if using the classic version of online scheduler this will always be the case, you will need to approve these appointments. To do this click on the bell icon at the top of ChiroSpring. Then click 'Appointment Requests'. As you can see in the image below we have 15 appointment requests that need to be confirmed. These occurred because the system could not match them based on the information the patient provided.

Next, select the patient you want to confirm. Then click 'Approve'. Of note, you can also edit the patient name from here (pencil icon). Or change the appointment date or time. To reject the request, select the patient, then click 'Reject'. You may also delete the request which wipes the request completely from the system.

Setup - Scheduler & Appointments
First you will need to create your visit types. Then determine three key components for each.
- Show online
- When toggled on, this appointment category will be available for patients to select with online scheduling.
- Prompt patient to choose provider
- When selected, patients will need to choose a provider after selecting the appointment category.
- When not selected, patients will only choose the appointment category (e.g. New Patient Visit). The software will then randomize which provider will receive the appointment based on the time the patient selected and what times were available for that provider.
- Time block settings
- Only allow these appointments inside of time blocks
- When checked, patients will only be able to book appointments online during times you defined a time block (for this same appointment category). As an example, if you want to schedule "New Patients" on Wednesdays from 12 pm to 3 pm, you would first create a time block for this (this is done directly on the scheduler by clicking a time, then choosing the Time Block tab). Once that time block is created, then check the box (image below) to "only allow these appts inside of time blocks".
- Max appointments/time slot
- This defines how many of this appointment category you are willing to schedule into a given time slot. As an example, if you set this as 3, this means you are willing to allow up to 3 appointments for this visit category during that time slot. Often, something like "New Patient" would have 1 selected. This prevents double booking for new patient visits as an example.
- Only allow these appointments inside of time blocks
Go to settings/clinic/scheduler & appointments.

Setup - Provider Settings
There are additional settings you will need to enable to ensure your patients have the best online booking experience.
Go to settings/users & rooms.

From there pay attention to these two options:
- Selected as online appts provider
- When enabled, patients can schedule appointments to this provider
You will want to have this toggled on so you appear on the online scheduler as an available provider.
- Max appts/timeslot
- Make sure you have enough time slots based on the appointment categories you allow patients to book to. As an example, if you have new patient visits
*Always remember, when finished hover your Action button and Click/Touch the green SAVE icon
Setup - Scheduler
Next it's time to ensure your scheduler has the correct time increments as well as the start time and end time. As an example, if you want your patient's to not see appointments prior to 8 AM, make sure your start time is in fact 8 AM. The time increments you select will also determine what patients will see when booking an appointment online.
Click Scheduler (from the left menu).
In your Scheduler, click the GEAR icon in the top right. Here you can set the time increments. As an example, if you book every 15 minutes, you would choose 15 minutes.

Branding Customizations
You can personalize this page with your Brand Logo and Color. Go to Settings - Clinic - Customization.

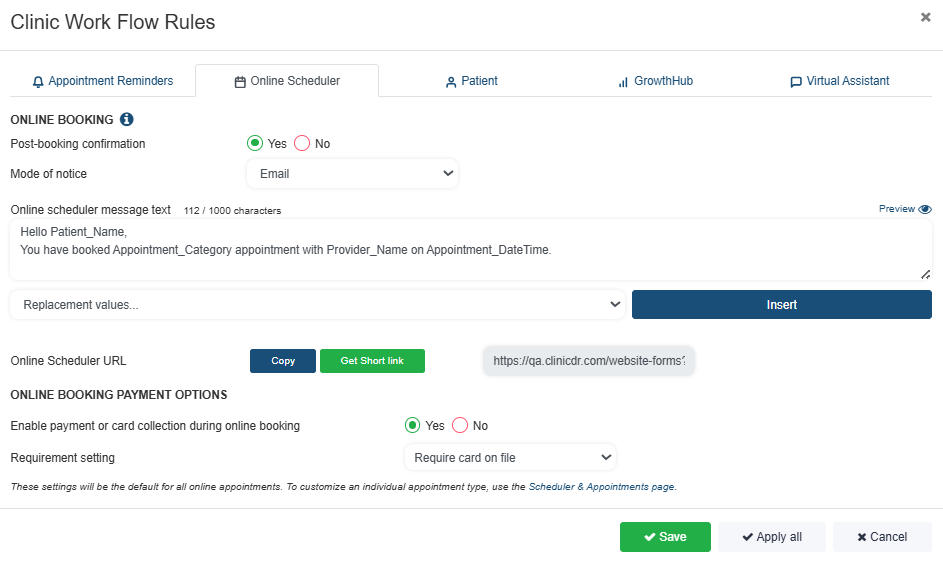
Collect Card on File or Require Deposit
Set the baseline rule your Online Scheduler will follow:
- Require Deposit – Patients pay a deposit to secure the appointment.
- Collect Card on File – Patients enter a card before scheduling (no charge is made).
These rules apply to all appointment types unless an appointment level override is added.
Where to set clinic defaults:
Settings - Communication - Workflow Rules - Online Scheduler
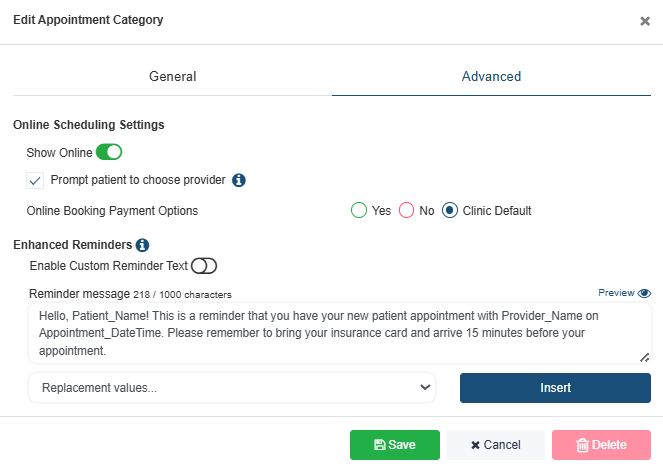
Appointment Level Overrides
Each appointment category can now override the clinic default with its own payment rule:
- Require Deposit – Collect a deposit amount just for this appointment type.
- Collect Card on File – Require a saved card only for this visit type.
- Use Clinic Default – Follows whatever rule you set at the clinic level.
Great for:
New patient appointments
High no show visits
Same day or high demand slots
Appointments requiring upfront commitment
Where to set overrides:
Settings - Clinic - Scheduler & Appts - Edit Appointment - Advanced - Online Scheduler Options
Your Online Scheduler URL
To find your online schedule URL go to settings/communication data.
You will see both "Online Booking" and Online Scheduler".
- Online Scheduler - This is the new interface (recommended)
- Online Booking - This is the old user interface (not recommended)
Copy either the "copy" (which is a long URL), or the short link (useful for text messaging).
💥PRO TIP: Create a QR Code
There are many websites that will allow you to create a QR code if you provide them a URL. You can then print this QR code out and have available at your front desk.
Embed Online Scheduling Directly on Your Website
Embedding places the scheduling page inside your website so visitors can book without leaving the page.
Step 1: Open your website editor
Log in to the platform where your website is hosted. Common platforms include:
- WordPress
- Wix
- Squarespace
- Webflow
- GoDaddy Website Builder
Step 2: Add a Custom HTML or Embed block
Look for a feature called:
- Embed
- Custom HTML
- Code Block
- HTML Widget
Most website builders include one of these options.
Step 3: Paste the embed code
Add the following code and replace the example link with your own scheduling URL.
<h2>Online Scheduling</h2>
<iframe
src="PASTE-YOUR-SCHEDULING-LINK-HERE"
width="100%"
height="900"
style="border:0;"
loading="lazy"
title="Online Scheduling">
</iframe>
Example:
<h2>Online Scheduling</h2>
<iframe
src="https://ca.clinicdr.com/website-forms/?uid=12345&tg=m07"
width="100%"
height="900"
style="border:0;"
loading="lazy">
</iframe>
Step 4: Save and preview
Preview the page to confirm the scheduling form appears and works correctly.
Step 5: Adjust the height if needed
If the scheduling page looks cut off, increase the height value:
height="1000"
Workflow Rules
Finally, you will need to define your workflow rules to ensure you are set up to accept instant online booking.
- Patient Hub 360 Mobile app
- Check if you want instant scheduling available through the patient app (it does not allow them cancel their appt) .
- Online Booking
- Select 'Yes' to send a patient an online booking confirmation message.
- Appointment Reminders
- Select 'On' to enable appointment reminders
- Select SMS or Email
Remember, in the patient's file - communicator - you can override default workflow rules for individual patients.

Setup - Time Blocks
Time blocks also work hand-in-hand with online scheduling. Let's say you want to define a schedule where only new patient appointments can be booked on Wednesdays from 12 pm to 3 pm. You can do this by setting up time blocks.

To get started with Time Blocks go to settings/scheduler & appointments.
For any of your appointment categories, check the box "Only allow these appts inside of time blocks". This will ensure for that category (e.g. New Patient Visit) that only New Patient Visit's can be booked during that time block.
You can also define the maximum amount of appointments that can exist within that time block. For example, if you only would like 1 maximum appointment to exist (across), choose 1 for "Max appointments/timeslot".

Setup - Time Blocks on Scheduler
To add a time block, click on an open time slot on your calendar. From there, select the right tab (see menu below) that says "Time Block".

Next define the type, category as well as the duration. If you want something as simple as an office visit to exist for "all day", choose "all day".
Choose repeat if you want to repeat the time block.
Type
- Provider Reserved - this is used to block out time. For example, let's say you want to block out lunch every day from 12 pm to 1 pm. Or, perhaps you want to block out a meeting for a day. When blocked, patients will not be able to book appointments during this time using online scheduling.
- Single Appointment Category - This is the option you will select when you want the time block to be used for appointment scheduling. For example, if you want new patients to schedule during 1-3 pm on Tuesdays, this is the option to use.

After your time block has been created you will see a notation for it on the far right of the scheduler. Clicking this will let you edit the time block at anytime.

As a reminder, with time blocks your patients will only be able to book appointments online for that appointment category. As an example, if you have a time block for New Patient Visits on Wednesdays from 12 pm to 3 pm, well, only new patient visits will appear as available during that time.
We hope you enjoy our online scheduler. Spending the time to get it setup correctly will have a huge impact with your online bookings.
Online Booking: Payment Options
You now have complete control over how payments are collected during Online Booking. This includes clinic-level defaults and appointment-level overrides, giving you flexibility to require payment only when it makes sense for your workflow.
Clinic Level Settings
Set the baseline rule your Online Scheduler will follow:
- Require Deposit – Patients pay a deposit to secure the appointment.
- Collect Card on File – Patients enter a card before scheduling (no charge is made).
These rules apply to all appointment types unless an appointment level override is added.
Where to set clinic defaults:
Settings - Communication - Workflow Rules - Online Scheduler
Appointment Level Overrides
Each appointment category can now override the clinic default with its own payment rule:
- Require Deposit – Collect a deposit amount just for this appointment type.
- Collect Card on File – Require a saved card only for this visit type.
- Use Clinic Default – Follows whatever rule you set at the clinic level.
Great for:
New patient appointments
High no show visits
Same day or high demand slots
Appointments requiring upfront commitment
Where to set overrides:
Settings - Clinic - Scheduler & Appts - Edit Appointment - Advanced - Online Scheduler Options
Want the full walkthrough?
We have a detailed guide with step-by-step instructions and examples.
Read the full article here 👉 Online Booking Payment Options