Save & Sign Provider Treatment Notes
In a busy practice, completing your SOAP note in real-time may not always occur. Complex patients need more documentation as do exams or PI visits. This is why ChiroSpring provides a feature to sign off on a note, signifying it is complete. This allows the doctor time to both start the note and see the patient, and remind them the note is not complete. This feature will ensure your notes are 100% complete, something you’ll want, should you ever be audited.
Activate Save & Sign
1. Click "Settings"
2. Click "Treatment Notes"

3. Click "Notes Settings"

4. Click the "Require providers to save notes and sign notes as separate steps" field.

5. Click "Save"

Authorize user to sign notes
1. Click "Users & Rooms"

2. Locate & Select Provider

3. Click to toggle on "Authorized to sign notes".

4. Click Action - Save User.

Save Treatment Note
1. Select Treatment Note Template

2. Once completion of note template

3. Complete Fee Slip

4. "Save" Fee Slip

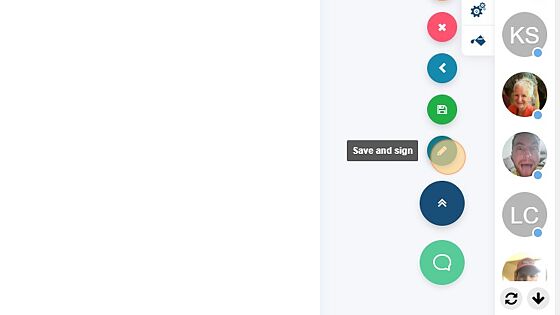
Save and Sign Treatment Note
1. Select Treatment Note Template
2. Once completion of note template
3. Complete the Fee Slip
4. Click Action.

5. Select "Save and sign".
View & Track Unsigned notes
1. Click "Reports"

2. Click "Visit Compliance"

3. Select the Date Range

4. Click "Search"

5. Locate "UNSIGNED"
