Digital Patient Intake Forms - Complete Guide
Patient intake can be a very time consuming process, and annoying process for your patient if you are doing them on paper. With ChiroSpring's digital patient intake forms (which are fully customizable and automated), you can assure your staff remains efficient and your patient experience is top notch.
Digital Patient Intake Forms are included with ChiroSpring 360 Pro and ChiroSpring 360 Pro+ plans.
What Forms Are Included?
Forms are built natively into your ChiroSpring 360 account. Included with Pro and Pro+ plans are:

HIPAA Consent Document - Included in customizable templates
Contact Information - This allows you the ability to send a request for patient contact information (name, address, DOB, phone, email etc). This information auto populates into ChiroSpring saving you valuable time.
Health Questionnaire - This is a Patient Intake Form that is prebuilt and included in customizable templates. You can use this one, customize this one or build your own Patient Intake Form(s) using the custom template builder.
Regan Therapy Consent - This is a hard coded form that you can choose to use or not use, it's not available to customize.
Neck Disability Questionnaire - Our two included outcome assessments will auto score. These are the only two currently that autoscore, ChiroSpring does plan to add more in the future. There is not a set timeline, but please do follow What's New articles and will highlight there as more OATs included that autoscore become available!
Low Back Disability Questionnaire - SAME as Neck Disability Questionnaire
** These 6 forms are hard coded in 360 currently, so you are not able to remove them from this list.
However, you can choose simply not to use them. Not to attach them to any appt categories or select them. We do plan to allow in future ability to set this up more fluidly for your offices needs. Stay tuned to our What's New articles!
How to Customize Intake Forms
To start customizing patient intake forms go to SETTINGS/CUSTOM TEMPLATES/BUILD TEMPLATE.
Hover your Action Arrow in bottom, right corner to and select the (+) icon to Create New Template

Step 1: Choose Form Type and click next
You will be presented with three types of forms.
Treatment Note - This allows you to create Treatment Notes (SOAP Notes). You can dive into that deeper In the Provider Articles and Videos
Patient Kiosk - Forms created with this option are accesible in various ways below and assigned directly to the patient, so when completed, they will automatically link back to that patient.
Web Form - This bucket of forms is included in your Web Form URL. You can find that link in SETTINGS/COMMUNICATION DATA. Forms completed from this URL are NOT assigned to a patient. You will find them on your HomePage of 360 and can link to existing patient or create new
- New March 2026 -> You can generate a Unique URL for a single webform
Step 2: Give Form a Name
Give the Form a Name, you can change/edit this later and choose:
- Treatment: Used in treatment documentation
- These completed forms WILL appear at the top of the treatment notes to attach
- Admin: Use for administrative or consent purposes
- These forms will link to the patient file but will not appear at the top of the treatment note to attach
- Example: HIPAA Consent, Contact Card

Step 3: Choose how you want to build your form
- New Template (from scratch)
- SOAP Template
- Predefined Template - Choose this one to customize the HIPAA Consent and/or Health Questionnaire that is included
- Clinic's Archive - As a new client, you won't have anything in your clinic's archive, but as you build templates, you can then duplicate them or customize from them to fully fit your patient forms needs.

If you click on the EYEBALL icon, you can preview the templates and then you will click the RADIO icon and Next to start customizing a template.
Editing tools for Intake Forms
The form builder tool with ChiroSpring is very similar to your Provider Treatment Note builder, with less tools. So once you learn one, the other will follow simply.. And remember you can clone sections from one form to another (regardless of the type of form)

- Textbox (Label with text input)
- Number Input
- Memo field (Label with text, emoji, and image inputs allowed)
- Checkbox (Label with check box and sublevel checkbox/label)
- Note: Checkbox labels should be descriptive at each level to display best in the note output (i.e. if doing Checkboxes for Pain areas, label could read "Shoulder Pain, and the sublevel check boxes should could read "Shoulder pain right side, Shoulder pain left side" to read better than just Right and Left.
- Radio Group - This option allows for only ONE selection when documenting your note. If you desire multiple selections use the check-box option instead.
- Labels (Field label without additional text input)
- Paragraph (descriptive content for note template)
- Bonus Tip: You can paste an image into the Paragraph if want to include an image in your form
- Date picker (i.e. choosing date for onset date)
- Time picker (i.e. noting start time of rehab exercises)
- Adjustment strip
- Signature Pad
- Body Image (includes the pain icons patient can place anywhere on body) - not customizable
- Dropdown
- Percentage
- Meridians
You can save as Draft to finish later, Once you click Finish, the form will be "Live"
Remember you can copy and paste sections from One "form/template" to another regardless of type.
And you can Clone to a different TYPE (Web Form, Patient Kiosk, Treatment Note)
Cloning Web Forms/Patient Kiosk Forms
- Click the Clone Icon from your list of custom templates

- Change the Type
- Name Template
- Click Clone
- For Example, if I want to make this a webform also

It will Clone and Save as a Draft, you can edit and Save to make it Live

How to Assign the Intake Forms to your Patient
Option 1: Linking Forms to Appointment Categories (patient kiosk forms only)
To to Settings/Scheduler & Appointments to link forms to appointment categories. When you book an appointment for a patient with this appointment category the forms will automatically be assigned to the patient for completion.
- You can "assign" forms to a patient automatically using the Appointment Categories to link them to a reason of visit

Option 2: From Patient File
Communication Dashboard - Under Forms, you can click the Plus Icon to "assign forms" to a specific patient (patient kiosk form only)

How can Patients Complete Digital Intake Forms
Patient Kiosk Forms:
Option 1: Assigned Forms will Automatically appear in the patient mobile app
- You could send an SMS or Email to your patient to login to their app to complete any assigned forms prior to visit
- GrowthHub Pro users can use sms and/or email templates to streamline this and Appointment Listings Report to mass communicate this
Option 2: Send a direct SMS and/or EMAIL with a custom url the patient can open on any web browser to complete their assigned forms
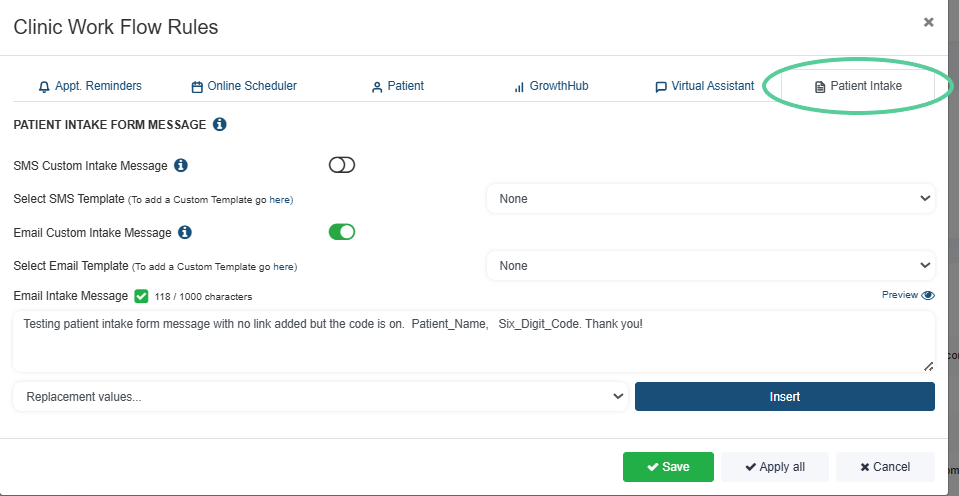
March 2026 Update, you can now customize the content of the SMS/Email Messages
- When assigning forms, you can now customize the message patients receive by text or email.
- Instead of the default “You have forms to complete,” practices can tailor the message to match their tone and instructions.
- Settings - Communication - Workflow Rules - Patient Intake
- Now includes support for replacement values, including:
- Location for appointment reminders and confirmations
- This gives practices more control over patient communication and branding.
In a Patient's File/Communicator Dashboard, you can scroll to the Patient Forms area.
- Use the (+) Icon to "serve up" any forms to a patient
- The Mail Icon next to the (+) gives you the option to SMS and/or Email the requested forms. It will give the patient a unique URL they can click from any device and will require their Date of Birth. Once finished by the patient, the completed forms will link automatically to the patient's file.
Clicking the three dots next to each form request gives you options to:
- Fill Out The Form (Someone in your office can click through the form with the patient)
- Delete the Form Request
- Change Appointment Date Linked with Form

Option 3: On the Patient Self Check In Kiosk, it will prompt patient to complete any assigned, uncompleted forms when they check in for their next visit

Web Forms
Option 1: By finding your Web Form Link wherever you may use and completing, recommend testing one out for yourself with fake data once you set up
You can find your custom webform url: SETTINGS/COMMUNICATION DATA
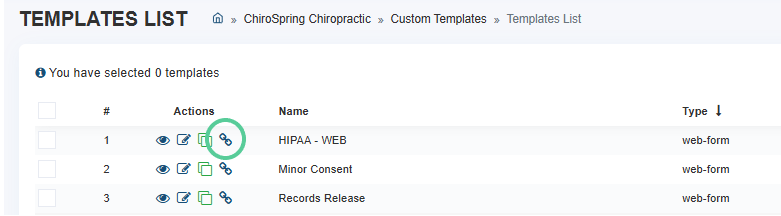
Option 2: You can now generate direct links for Individual Web Forms (March 2026 update)
- Send a single form directly via text or email or embed it on your website.
- Perfect for administrative forms, consents, or standalone intake documents.
- You could also create a Lead Form and embed on your website to generate New Leads
Locating Completed Forms
Step 1: Assign forms if necessary (Web Forms)
Patient Kiosk Forms
Once Patient Kiosk Forms are Completed they are automatically assigned to patient
Web Forms
Web forms must be assigned to a patient, they will appear on your Homepage when you login to ChiroSpring 360
Assigned Forms can then be found:
- Patient File - Treatment Dashboard - Records
- Patient File - Communication Dashboard - Records
- Patient File - Treatment Notes
- Patient's can view completed forms in their Patient Mobile App.
- At the top of a Patient Treatment Note Template to attach to the note
- In the Next Update of Patient Forms: Only Forms built to Attach as Treatment Notes will Appear at the top of the Provider Treatment Note with option to attach.
Intake to Treatment Note
Patient Intake (Subjective) Into Treatment Note
We've recorded a FULL VIDEO showing you this process.
Once your patient has been assigned intake forms, you can review their completion status from the front desk.

Next, start your Treatment Note. You will see a section at the top for Patient Intake.

To attach a document, simply click the green plus icon to attach.
This will open a dialog letting you preview that intake. In addition, you may attach additional documents within this same dialog by clicking the blue plus sign.
To remove an attached document, click the red minus sign.

Of note, documents that can be edited can be edited by you. Click the pencil icon to edit a document.
Now that your patient's intake form(s) are attached, they will appear in your treatment note when printed (appended).
Additional Templates ChiroSpring can Clone into your Account
A ChiroSpring Super Admin team member can clone any of the following to your account. To request, please email service@chirospring.com the templates you want cloned.
** If you have created a digital form or note template that you want to share to our global list, please do email service@chirospring.com. We will have a small token of our appreciation for sharing too ;)